Showing posts with label build. Show all posts

Tuesday, February 4, 2014

Build a Tremolo Effect Circuit Diagram

This tremolo effect circuit uses the XR2206 and the TCA730 IC which is designed as an electronic balance and volume regulator with frequency correction. The circuit is use full for stereo channels and it also has the ability to simulate the Lesley effect aka rotating loudspeaker effect.

How does the tremolo effect circuit works
Balance and volume settings are done with a linear potentiometer for both channels. If this potentiometer is replaced with an AC voltage source, a periodic modulation of the input signal can be achieved. This AC voltage source comes from the function generator IC XR2206. This IC generates square, triangle and sine wave signals but for this project we use only the sine wave.

IC  Tremolo Effect Circuit Diagram
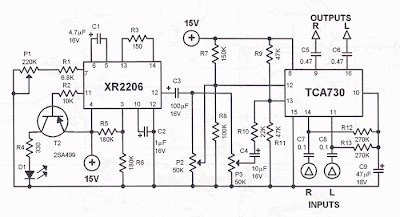
 Tremolo Effect Circuit Diagram

The modulation voltage can be varied with P1 from 1 Hz up to 25 Hz. Resistor R3 sets the operation level of the sine wave generator. R5 and R6 set the DC voltage and the sine wave amplitude at the output. C2 is a ripple filter. The square wave output of the XR2206 drives T2 and a LED to optically display the frequency.

The modulating voltage reaches pin 13 of TCA730 via P3 and R10. This input functions as the volume control or in this case the volume modulation. The degree of the balance modulation (Lesley effect) can be varied with P2. A regulated power supply using 7815 IC is recommended. Do not use a non-stabilized power supply since the current variations would influence the modulation negatively.
Attach the 7815 IC to a good heat sink (about 10 cm2).
Read More..

Friday, December 27, 2013

Build a PIC Security System Dials Your Cell Phone Circuit Diagram

This is a simple PIC Security System Dials Your Cell Phone Circuit Diagram. Do-it-yourself phone dialer security system calls your cell phone, office etc. whenever a door or window is opened, or panic button is pressed. Great Home Alarm.

PIC Security System Dials Your Cell Phone Circuit Diagram

PIC Security System Dials Your Cell Phone Circuit Diagram


The circuit consists of a small PIC microcontroller, assembly program, and a few other parts to detect a switch closure from an open door, window, or manual push button and then dial the cell phone number, and transmit a steady tone to indicate the source of the call. The circuit uses the pulse dialing system to interrupt the line connection a number of times to indicate each digit. Pulse dialing (the oldest form of dialing) works by actually disconnecting or "hanging up" the phone line a number of times to indicate each digit. For example, the digit "5" would be dialed by disconnecting and reconnecting the line 5 times in short intervals of about 100mS. There is about a 1 second pause (with the line connected) between each digit. The timing is not critical and I was able to dial 411 and connect to the local information service just using a momentary push button switch in series with the phone line.

Circuit Operation:
In operation, the switch closure is detected on pin 7 of the processor which activates the reed relay and takes the line off-hook for 3 seconds to establish the dial tone. The processor then dials the number by opening and closing the relay a number of times for each digit. When dialing is complete, the processor waits 3 seconds and then transmits a steady tone of about 300Hz for 30 seconds through the modem transformer. The call is then terminated and the processor waits for the switch to open before resetting.

Design Considerations:

The PIC16F628 (18 pin) processor was selected because I had a few on hand and my homemade hardware programmer only accepts 18 pin devices. A smaller 8 pin device could have been used since only three I/O lines are needed, but the difference in cost is only about $1.50. One of the I/O lines (RA5) is used for programming and is always an input, but can used as a functional input so the switch closure could be detected on this line thus eliminating the need for one pullup resistor. But I elected to use 3 consecutive I/O pins (7,8,9) of the 8 bit port B and leave RA5 pulled up with a extra 10K resistor.

The output pins (8,9) that drive the relay and transformer are limited to 25mA of current each, so an extra transistor (2N2222A) was needed to supply additional current to the relay coil. The transformer resistance is around 100 ohms, so an additional 330 ohm resistor was added in series with pin 9 to limit the transformer current to around 10mA. An LED indicator and 330 ohm resistor were used on pin 8 to observe the dialing activity and indicate the line status. Several of the parts (relay, transformer and blocking capacitor) were obtained from an old 56K modem card.

The schematic shows a 47uF / 50 volt non-polarized capacitor used to block DC current to the transformer, however a regular polarized 50uF cap could be used if correct phone line polarity is observed. The modem was probably designed to work with unknown polarities at different locations, so a non-polarized cap was used. Its possible the cap and 470 ohm resistor can be replaced with a single resistor in series with the line to set the "off hook" line current to around 20mA. This may cause partial saturation of the transformer and reduced audio level, but might work well enough.

The power supply voltage is not critical and a 4.5 volt supply from three AA batteries should work. Or a switching type regulated 5 volt wall transformer can be used. The problem is insuring the relay gets enough voltage to operate. The rest of the circuit should run on reduced voltage. I used a 4.2 volt cell phone charger that worked well.

 Softwre
Read More..

Thursday, December 26, 2013

Build a Simple Emergency Light and Alarm Circuit Diagram

This Simple Emergency Light and Alarm Circuit Diagram is permanently plugged into a mains socket andNI-CD batteries are trickle-charged. When a power outage occurs,the lamp automatically illuminates. Instead of illuminating alamp, an alarm sounder can be chosen.When power supply is restored, the lamp or the alarm isswitched-off. A switch provides a “latch-up” function, in orderto extend lamp or alarm operation even when power is restored.Circuit operation:Mains voltage is reduced to about 12V DC at C2`s terminals, bymeans of the reactance of C1 and the diode bridge (D1-D4). Thusavoids the use of a mains transformer.

 Simple Emergency Light and Alarm Circuit Diagram

Simple Emergency Light and Alarm Circuit Diagram


Trickle-charging current for the battery B1 is provided by theseries resistor R3, D5 and the green LED D6 that also monitorsthe presence of mains supply and correct battery charging.Q2 & Q3 form a self-latching pair that start operatingwhen a power outage occurs. In this case, Q1 biasing becomespositive, so this transistor turns on the self latching pair.

If SW3 is set as shown in the circuit diagram, the lampilluminates via SW2, which is normally closed; if set the otherway, a square wave audio frequency generator formed by Q4, Q5 andrelated components is activated, driving the loudspeaker.If SW1 is left open, when mains supply is restored the lamp orthe alarm continue to operate. They can be disabled by openingthe main on-off switch SW2.If SW1 is closed, restoration of the mains supply terminateslamp or alarm operation, by applying a positive bias to the Baseof Q2.

Notes:

Close SW2 after the circuit is plugged.Warning! The circuit is connected to 220Vac mains, then some parts in the circuit board are subjected to lethal potential! avoid touching the circuit when plugged and enclose it in a plastic box. 

Parts List
R1____________220K 1/4W Resistor
R2____________470R 1/2W Resistor
R3____________390R 1/4W Resistor
R4______________1K5 1/4W Resistor
R5______________1R 1/4W Resistor
R6_____________10K 1/4W Resistor
R7____________330K 1/4W Resistor
R8____________470R 1/4W Resistor
R9____________100R 1/4W Resistor

C1____________330nF 400V Polyester Capacitor
C2_____________10΅F 63V Electrolytic Capacitor
C3____________100nF 63V Polyester Capacitor
C4_____________10nF 63V Polyester Capacitor

D1-D5________1N4007 1000V 1A Diodes
D6______________LED Green (any shape)
D7___________1N4148 75V 150mA Diode

Q1,Q3,Q4______BC547 45V 100mA NPN Transistors
Q2,Q5_________BC327 45V 800mA PNP Transistors

SW1,SW2________SPST Switches
SW3____________SPDT Switch

LP1____________2.2V or 2.5V 250-300mA Torch Lamp

SPKR___________8 Ohm Loudspeaker

B1_____________2.5V Battery (tw1o AA NI-CD rechargeable cells wired in series)

PL1____________Male Mains plug

Read More..

Friday, December 20, 2013

Build a Photomultiplier Circuit Diagram

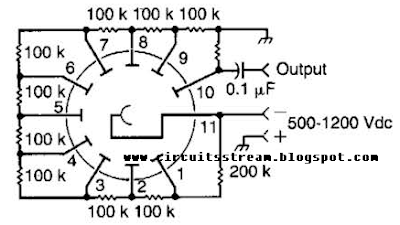
How to Build a Photomultiplier Circuit Diagram? This Photomultiplier Circuit Diagram is typical of the way that a photomultiplier tube is used. The circuit shown is ac coupled, but if dc coupling is needed, the capacitor can be omitted and a suitable interfacing method used. A typical tube is the widely available 931/931A.

Photomultiplier Circuit Diagram

Photomultiplier Circuit Diagram

Read More..

Thursday, December 19, 2013

Build a Full Wave Rectifier Circuit Diagram

This is the simple full wave rectifier circuit diagram.When equality of two equations shown in satisfied, full-wave output of circuit is symmetrical. The circuit uses a CA3140 BiMOS op amp in an inverting gain configuration.

Full Wave Rectifier Circuit Diagram

Full Wave Rectifier Circuit Diagram

Read More..

Wednesday, December 18, 2013

Build a Digital Theremin Circuit Diagram

Theremin circuit shown in this schematic diagram uses digital component, so we can call it a digital Theremin. This circuit employs  logic inverter 74C04 or CD4069 hex inverter and CD4046 phase-locked-loop (PLL) IC. 

The CD4069 logic inverter is operated as a fixed-frequency oscillator with  frequency around 100kHz. The CD4046 is operated as a variable frequency oscillator which is adjustable around 100kHz. The exact center frequency of the on-chip oscillator is determined by R4, C2 and R3. Here is the schematic diagram of the circuit. 

Digital Theremin Circuit Diagram

The frequency of variable oscillator frequency circuit can be shifted several kilohertz by moving your hand approaching the antenna since the C2 and the antenna form an equivalent parallel capacitance. The frequency of the variable oscillator should be set to the same frequency of fixed oscillator when there is no hand or human body close to the antenna. 

This  calibration is done by adjusting the  zero control R4 pot with this simple rule: If  both oscillators (the fixed and the variable) are set to the same frequency then the Theremin will produce no output (silent). This Theremin circuit will start  producing audible tone if you move your hand approaching the antenna since it will shift the frequency of the variable oscillator. You can play this Theremin circuit by moving your right hand around the antenna and at the same time turning the volume knob R5 with your left hand.
Read More..

Tuesday, December 17, 2013

How to Build a Simple Power supply Circuit Diagram

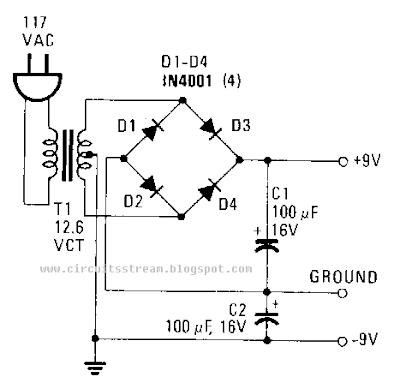
To day i share this post how to Build a simple power-supply circuit diagram lets start . This simple power supply circuit diagram delivers plus and minus 9 V to replace two 9-V batteries. The rectifier circuit is actually two separate full-wave rectifiers fed from the secondary of the transformer. One full-wave rectifier is composed of diodes D1 and D2, which develop +9 V, and the other is composed of D3 and D4, which develop -9 V. 

Each .diode from every pair rectifies 6.3 Vac, half the secondary voltage, and charges the associated filter capacitor to the peak value of the ac waveform, 6.3 x 1.414 ~ 8.9 V. Each diode should have a PIV, Peak Inverse `Voltage, rating that is at least twice the peak voltage from the transformer, 2 x 8.9 ~ 18 V. The 1N4001 has a PIV of 50 V. I hope you are enjoy this circuit.

Simple Power supply Circuit Diagram

Simple Power supply Circuit Diagram


Read More..

Monday, August 12, 2013

How to Build a 2 to 4 Wire Audio Converter

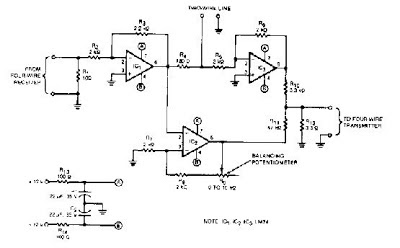
This audio converter circuit maintains 40 dB of isolation between the two halves of entry and exit of a four-line son, while allowing a line connecting two son. A balancing potentiometer, R, adjusts the gain of zero lC2to crossing the inlet to the outlet .

The adjustment is done in terms of work just after installation by inserting a 1 kHz tone at the entrance of four son and setting R to the minimum output signal 82-ohm dummy-load resistor is placed between two wire terminals .

 2 to 4 Wire Audio Converter Circuit Diagram

How to Build a 2 to 4 Wire Audio Converter

Read More..

Wednesday, August 7, 2013

How to Build Toxic Gas Detector and Alarm Circuit with TGS813

The danger always exists, when the fuel gases such as propane or gas are confined to a small area. The alarm of toxic gases figs. 1-45 utilizes a tin-oxide-semiconductor. A coil of thin wire heated by a battery 12 V via IC1 and IC2, which pulses the voltage to the coil of the sensor, saving a significant amount of energy. Diode Zener Dl provides a constant voltage to the filament coil sensor. resistance of the sensor reduces the sensor is exposed to toxic gases such as hydrogen, carbon

Carbon monoxide and propane. To reduce the resistance of the sensor, the SCR gate voltage increases. When the gate threshold voltage is reached, the SCR fires and a buzzer alarm is activated. Once activated, the bell and the switch S1 should be used to reset the alarm. Since the sensor has a good deal of thermal inertia, S1 must be off or open for about three or four minutes after the initial activation, allowing the sensor to stabilize, thus avoiding false alarms. R7 sensitivity control set to the desired value, before the activation of SCR.

How to Build Toxic Gas Detector and Alarm Circuit with TGS813

The toxic gas alarm is sensitive to less than 100 ppm of carbon monoxide. This alarm is useful for simple gas boats, sheds and cabins. You could save a life. Some of the companies listed in the Appendix to offer plans and kits for various toxic gas sensors.

Part List
Part Description
C1 0,01-MFD, 25-V capacitor (disc)
1 9-V zener diode D1 (NTE139A)
1 D2 4-V diode zener (NTE5068A)
1 SCR D3 (NTE5408)
1 Q1 Transistor 2N2222
U1 1 CD4013 CMOS flip-flop
1 U2 CD4049 CMOS Inverter Hex
1 siren piezo BUZ 6-9V
1 S1-TGS203 toxic gas sensor (Figaro or equivalent)

Read More..

Tuesday, August 6, 2013

Build a Positive And Negative Voltage Switching Supply

Build a Positive And Negative Voltage Switching Supply. An LT1172 generates positive and negative voltages from a 5-V input. The LT1172 is configured as a step-up converter. To generate the negative output, a charge pump is used. C2 is charged by the inductor when D2 is forward-biased and discharges into C4 when LT1172`s power switch pulls the positive side of C2 to ground. 

 Positive And Negative Voltage Switching Supply  Circuit Diagram

 Positive And Negative Voltage Switching Supply  Circuit Diagram
 
Read More..

Saturday, August 3, 2013

Build a 0 To 12V 1A Variable Power Supply Circuit Diagram

This 0- to 12-Vdc variable power supply uses an IC voltage regulator and a heavy-duty transformer to provide a reliable dc power supply. Looking at the schematic shown, you can sec that transformer Tl has a 120-V primary and a 28-V secondary. Filtered dc is fed to the input (pin 2) of the LM317T voltage regulator, IC, which keeps the voltage at its output constant (pin 3) regardless (within limitations) of the input voltage. 

Pin 1 of the LM317T is the adjustment pin. Varying the voltage on pin 1 (via PI) varies the output voltage. Diodes D5 through D7 and LEDs LI through L3 give an approximate indication of the output voltage. Each LED/diode path has a limiting resistor to limit the current to a level that is safe for the LED. 

 Build a 0 To 12V, 1A Variable Power Supply Circuit Diagram


Build a 0 To 12V, 1A Variable Power Supply Circuit Diagram
Read More..

Tuesday, July 30, 2013

Build a Charger Extends Lead Acid Battery Life Circuit Diagram

The Charger Extends Lead-Acid Battery Life Circuit Diagram furnishes an initial charging voltage of 2.5 V per cell at 25°C to rapidly charge a battery. The charging current decreases as the battery charges, and when the current drops to 180 mA, the charging circuit reduces the output voltage to 2.35 V per cell, floating the battery in a fully charged state. 

This lower voltage prevents the battery from overcharging, which would shorten its life. The LM301A compares the voltage drop across R1 with an 18-mV reference set by R2. The comparator`s output controls the voltage regulator, forcing it to produce the lower float voltage when the battery-chaiging current passing through R1 drops below 180 mA. the 150-mV difference between the charge and float voltages is set by the ratio of R3 to R4. The LEDs show the state of the circuit . 

Charger Extends Lead-Acid Battery Life Circuit Diagram

Charger Extends Lead-Acid Battery Life Circuit Diagram

Read More..

Tuesday, April 30, 2013

Build 16 Stage Bi Directional LED Sequencer

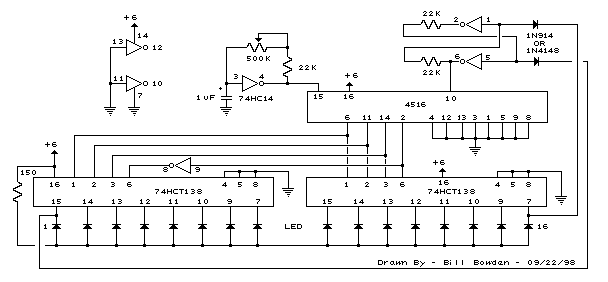
The bi-directional sequencer uses a 4 bit binary up/down counter (CD4516) and two "1 of 8 line decoders" (74HC138 or 74HCT138) to generate the popular "Night Rider" display. A Schmitt Trigger oscillator provides the clock signal for the counter and the rate can be adjusted with the 500K pot. Two additional Schmitt Trigger inverters are used as a SET/RESET latch to control the counting direction (up or down). Be sure to use the 74HC14 and not the 74HCT14, the 74HCT14 may not work due to the low TTL input trigger level. When the highest count is reached (1111) the low output at pin 7 sets the latch so that the UP/DOWN input to the counter goes low and causes the counter to begin decrementing.

 When the lowest count is reached (0000) the latch is reset (high) so that the counter will begin incrementing on the next rising clock edge. The three lowest counter bits (Q0, Q1, Q2) are connected to both decoders in parallel and the highest bit Q3 is used to select the appropriate decoder. The circuit can be used to drive 12 volt/25 watt lamps with the addition of two transistors per lamp as shown below in the section below titled "Interfacing 5 volt CMOS to 12 volt loads"

Circuit diagram

Read More..

Friday, April 12, 2013

Build LM1812 Ultrasonic Transceiver

The LM1812 is a complete ultrasonic transceiver on a chip designed for use in a variety of pulse-echo ranging applications. The chip operates by transmitting a burst of oscillations with a transducer, then using the same transducer to listen for a return echo. Ifan echo of sufficient amplitude is received, the LM1812 detector puts out a pulse of approximately the same width as the original burst. The closer the reflecting object, the earlier the return echo. 

Ultrasonic-Transceiver Circuit Diagram
Ultrasonic-Transceiver-Circuit-Diagram1

Echos could be received immediately after the initial burst was transmitted, except for the fact that the transducer rings. When transmitting, the transducer is excited with several hundred volts peak to peak, and it operates in a loudspeaker mode. Then, when the LM1812 stops transmitting and begins to receive, the transducer continues to vibrate or ring, even though excitation has stopped. The transducer acts as a microphone and produces an ac signal initially the same amplitude as the transmit pulse. This signal dies away as is governed by the transducer"s damping factor, but as long as detectable ringing remains, the LM1812"s detector will be held on, masking any return echos.Link
Read More..

Wednesday, April 10, 2013

Build Permanent Magnet Motor Chatroulettehof

Smith Motors Wiring Diagram on Here S The Wiring Diagram For Your Motor W O Generator   Ajilbab Com
Here S The Wiring Diagram For Your Motor W O Generator Ajilbab Com.


Smith Motors Wiring Diagram on How To Wire Up 115v 2 Speed 1 Hp A O  Smith Motor     Above Ground
How To Wire Up 115v 2 Speed 1 Hp A O Smith Motor Above Ground.


Smith Motors Wiring Diagram on 01   A O Smith Centurion Square Flange Pool Pump Motor  0 75 Hp
01 A O Smith Centurion Square Flange Pool Pump Motor 0 75 Hp.


Smith Motors Wiring Diagram on Build Permanent Magnet Motor Http Chatroulettehof Com What Is The Ics
Build Permanent Magnet Motor Http Chatroulettehof Com What Is The Ics.


Smith Motors Wiring Diagram on Small Ac Electric Motors Ultimate Washer Customer Id Top Quality Small
Small Ac Electric Motors Ultimate Washer Customer Id Top Quality Small.


Smith Motors Wiring Diagram on My Blower Motor Went Out Today And I Bought A New Ao Smith
My Blower Motor Went Out Today And I Bought A New Ao Smith.


Smith Motors Wiring Diagram on 4hp Ao Smith Electric Pool Motor  Hayward  For 56j Fr Motors
4hp Ao Smith Electric Pool Motor Hayward For 56j Fr Motors.


Smith Motors Wiring Diagram on Syncro Gear Module By Us Electric  1 3 Hp Listing  129425
Syncro Gear Module By Us Electric 1 3 Hp Listing 129425.


Smith Motors Wiring Diagram on Click On Picture To Enlarge
Click On Picture To Enlarge.


Smith Motors Wiring Diagram on Motor 5 Hp Century   A O Smith Air Compressor Electric Motor
Motor 5 Hp Century A O Smith Air Compressor Electric Motor.


Read More..